Mailbox Setup (Outlook 2003)
Back To Online Support
How to setup a mailbox on Microsoft Outlook 2003
Below are the steps you need to follow in order to setup your mailbox
Step 1:
Open Outlook 2003
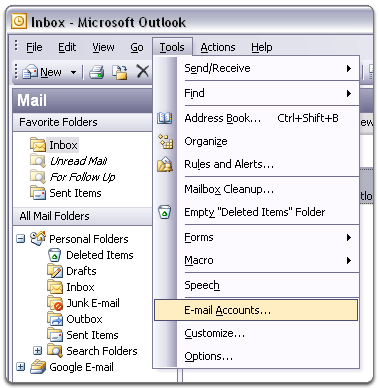
Step 2:
Click the Tools menu, and select "E-mail Accounts..."
Step 3:
Select "Add a new e-mail account," and click Next.

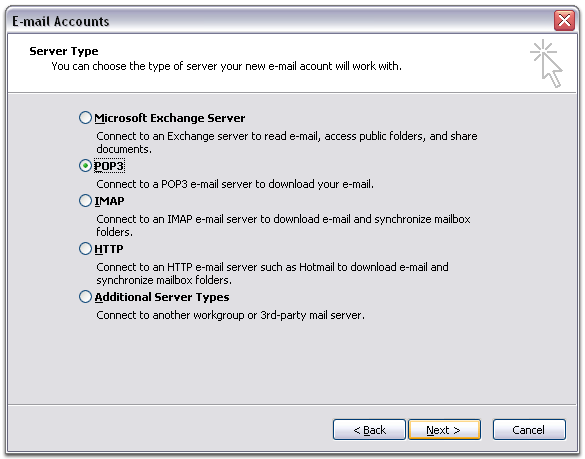
Step 4:
Choose "POP3" as your server type by clicking the radio button, and click Next.
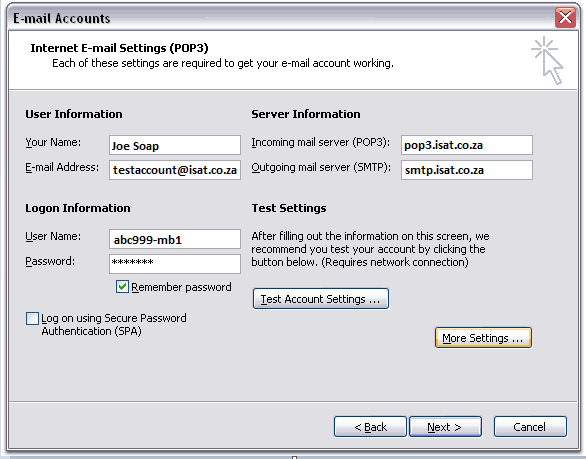
Step 5:
Fill in all necessary fields to include the following information:
User Information
Your Name: Enter your name as you would like it to appear in the 'From:' field of outgoing messages.
Email Address: Enter your full webmail address.
Server Information
Incoming mail server (POP3): pop3.isat.com
Outgoing mail server (SMTP): Please remember the outgoing mail server (SMTP) is dependent on the internet connection you are using.
- If you are using mobile data e.g. MTN (mail.mtn.co.za), Vodacom (smtp.vodamail.co.za).
- If you are unsure of your mail server settings, please contact your ISP.
Login Information
User Name: Enter your Mailbox Username
Password: Enter your Mailbox Password
Step 6:
Click the "Advanced" tab, and Enter 110 in the box next to "Incoming server (SMTP):".

- Optional: If you would like to use both Pop3 and Webmail, check the box for "Leave a copy of messages on server";
Under the header Delivery on the Advanced Tab, you have a few options here, depending on your needs.
- Recommended setup: Make sure that "Leave a copy of messages on the server" is checked. Then change the "14" to the number of days you want to leave messages on our servers.
- Multiple Devices: Make sure that "Leave a copy of messages on the server" is checked. You can either set the number of days you want to leave messages on our servers or alternatively, uncheck the "Remove from server after x days" checkbox completely
- If you check "Remove from server when deleted from Deleted Items", then messages will be deleted when you delete them in Outlook. This may be useful if you&Apos;re trying to keep your Webmail box (sort-of) in sync with Outlook without using IMAP, but you shouldn't choose it if you're leaving messages on our server to be backed up.
- Click "Test Account Settings..." After receiving "Congratulations! All tests completed successfully," click Close.
- Click Next, and then click Finish.
If you have any problems setting up your Mail account please feel free to call us on 010 555 0650.
Regards,
The iSAT Team
Back to top